Butternut, Kale and Sage Derby Quiche

I love all kinds of cheese and experimenting with recipes that contain cheese. When I was a child I used to look at Sage Derby in the delicatessen and think because it was so green, it must be really strongly flavoured, or pungent. However, when I actually tasted it, I loved it. Not strong at all, but a lovely fragrant, herby cheese that’s good for eating and cooking with.

butternut quiche

I discovered Fowlers Sage Derby cheese recently and it caught my eye as it didn’t have the usual bright green marbling. It was however, full of sage. I tried it and absolutely loved it, so of course I had to try and cook with it.

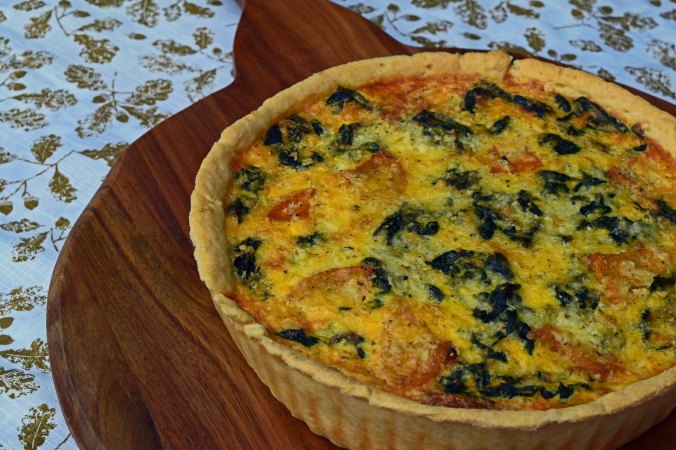
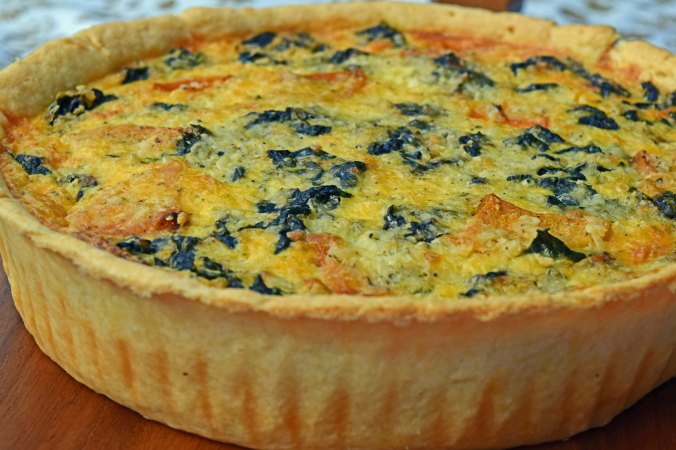
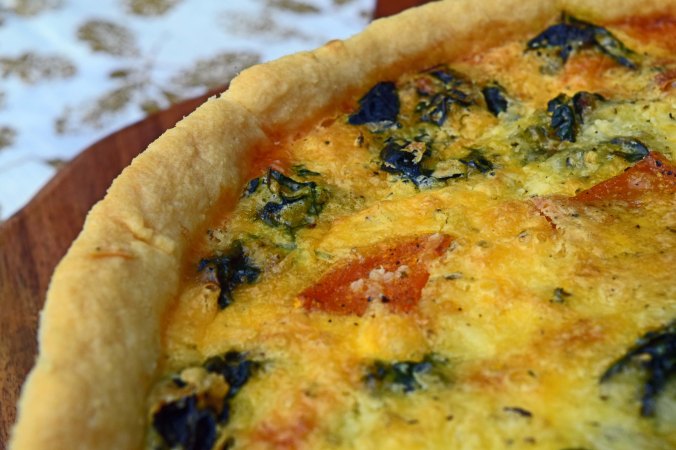
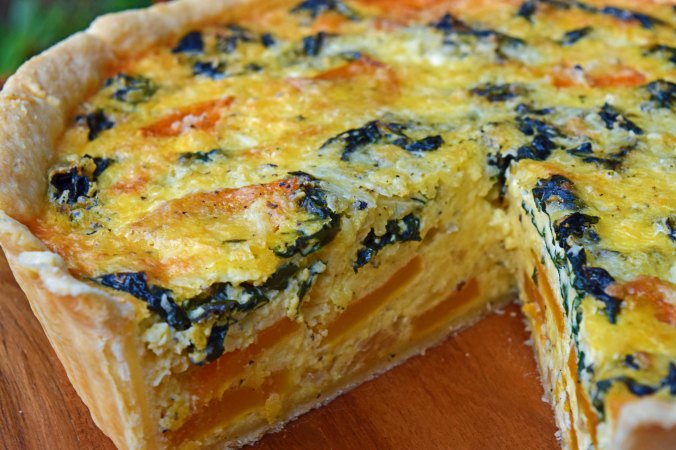
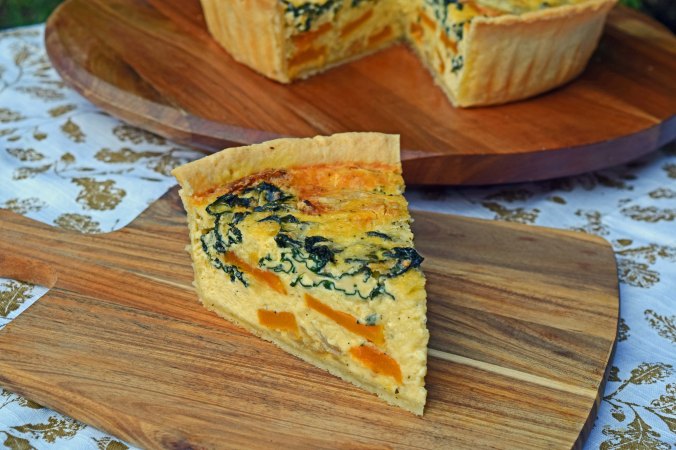
The autumnal weather we have been having lately has been making me think of the flavours of autumn – kale and butternut squash and of course sage goes so well with it. I decided the best way to showcase the cheese was in a quiche. Roasted butternut squash, wilted kale cooked with a little fresh sage and lots of the Sage Derby cheese. The result was completely decadent and delicious.

Butternut quiche side

Crust:
300g/10.5oz plain/all-purpose flour
1tsp salt
227g/8oz butter cut into cubes and chilled
1 large egg, beaten
1-2tbs iced water

Ingredients:
1 small butternut squash, peeled, halved and seeds removed (a small pumpkin would also work well)
1 large onion, halved and thinly sliced
1 bunch of Cavalo Nero/Tuscan Kale, washed, ribs removed and roughly chopped or torn
5 fresh sage leaves, finely shredded
6 extra large eggs
280g Sage derby cheese – grated
¾ pint double/heavy cream
Salt and pepper
A few scrapes of fresh nutmeg
A little olive oil and butter

Method:
Add the flour, salt and butter to a food processor fitted with the steel blade. Pulse until the butter is the size of small peas, or rough breadcrumbs.  Add the iced water a little a time until the dough just comes together.  You might not need all of the water.

Form the dough into a ball, flatten into a disc and wrap in plastic. Leave to chill for 30 minutes.

Roll out the pastry and, without stretching, line the base and sides of a 10inch/25cm tin. Return to the fridge and chill for another 30 minutes.

Preheat the oven to 180°C/350°F

Line the pastry with parchment paper or foil, leaving plenty to come up the sides. Fill with baking beans and place in the oven to blind bake for 15-20 minutes.  Take the pastry shell out of the oven, remove the paper and beans and return to the oven for further 5 minutes or until the pastry feels dry.  Leave to cool a little before adding the filling.

Pre-heat the oven to 220°C/430°F and slice the butternut squash just under 1cm thick and cut the slices in half. Toss in 1tbs olive oil with 1tsp salt and freshly ground black pepper and roast in the oven until the squash is tender and catching on the edges. This will take around 25 minutes.

While the squash is roasting, heat ½tbs of oil and a small knob of butter in a pan and sauté the onion slowly with a pinch of salt and pepper until they are soft and golden. Set aside to cool

Then in the same pan, add a tiny bit more butter if the pan is dry and sauté the kale and shredded sage until wilted, set aside with the other vegetables.

Lower the oven to 180°C/360°F

Roll out the pastry on a floured board and line a 25cm/10inch tin, leaving an excess to trim off later.

Butternut quiche close up

Place baking paper in the tin and fill with baking beans. Bake blind for 20 minutes. Remove the paper and beans and then return to the oven to bake for another 5 minutes.

Whisk the eggs and cream with the nutmeg, another ½tsp salt and a little more black pepper. Stir in the grated cheese.

Layer the onions, squash and kale in the pastry case and cover with the cheesy egg mixture.

Carefully place in the oven and bake for 30-40 minutes or until just set in the middle. The quiche will be puffed and golden brown and smelling delicious.

butternut quiche slice out

This is lovely eaten warm with a salad, but equally good cold. We had some of this one cold with some pickled shallots which went together perfectly.

Quiches are always good to take on a picnic or put in a lunchbox too. I think this one is good any time of year, but would be perfect for an autumn picnic and could easily hold its own on a festive table at Christmas.

Butternut quiche slice

It’s still summer now, but the butternut squash and sage combination is a precursor for all the Autumnal flavours – coming soon!

Baby chocolate Oreo tea cakes with marbled chocolate cheesecake frosting

This recipe makes a lot (at least 18), so would be perfect for a bake sale or fund raising coffee morning.

Oreo cakes

I used the Master Class, non-stick, 12 hole mini sandwich tin for this recipe. It makes perfect cakes with straight sides and has loose bases, so every single cake comes out with no effort.  I got mine from Amazon here.

I once had a delicious cupcake at Starbucks that had a mini Oreo cookie on the top. The girl serving us was enthusing how pleased she was that they had started using the mini cookies, rather than half a normal sized one. I thought it was really nice and wanted to make my own version at home.

The cake recipe includes instant espresso powder which (as Ina says) brings out the chocolate flavour even more. The cakes by themselves are very moist, but the frosting is the star here.

I have seen many recipes online for oreo cupcakes with a lot of them using ground up oreos in the frosting. I’m not so keen on the little bits in the frosting, so decided that I would make a smooth icing with mine.

I then thought how good a cheesecake type frosting would be and because I couldn’t decide whether to do a white or a dark chocolate version, I decided to use both! I don’t have any duel colour piping bags, so just divided the frosting and put melted white chocolate in one half, melted dark chocolate in the other half and made delicious marbled chocolate cheesecake buttercream frosting.  These are very rich and indulgent, but very good with coffee for an occasional treat or for afternoon tea.

…unless you are my eldest son and can easily eat 3 or 4 before feeling a bit sick!

Oreo Cake

Cake ingredients:
400g plain/all-purpose flour
50g cocoa
2tbs instant espresso powder
350g golden caster sugar
2tsp baking powder
1tsp bicarbonate of soda
½tsp salt
3 extra-large eggs
175g unsalted butter at room temperature
1tbs vanilla extract
150ml sour cream
130ml vegetable oil
300ml whole/full fat milk

Method:
Sift together the flour, cocoa, espresso powder, baking powder, soda and salt in a large bowl.

In a stand mixer with the paddle attached, whip the softened butter with the sugar until light and fluffy – around 5 minutes.

Beat the eggs with the oil and milk and with the mixer still running, add to the butter and sugar until fully incorporated.

Then with the mixer on low speed, add all the dry ingredients until just mixed in.

Using an ice cream scoop, distribute the cake batter into the waiting tin and bake for around 20 minutes or until a toothpick comes out clean. Repeat with the rest of the cake batter until you have 18 cakes. Leave to cool completely.

Marbled Chocolate Cream Cheese Frosting:
360g room temperature cream cheese
360g icing sugar – sieved
120g softened butter
1tsp vanilla extract
1tsp instant espresso powder
100g packet of good quality white chocolate – broken into smaller pieces
100g packet of good quality 70% cocoa solids chocolate – broken into smaller pieces

Method:
Melt the dark chocolate with the espresso powder in the microwave for 30 seconds and stir, then microwave again for 10 seconds, stirring and repeating until almost melted. The residual heat will continue to melt as you stir. Leave to cool and repeat with the white chocolate.

Beat the cream cheese with a stand mixer fitted with the paddle attachment or a hand mixer until light and fluffy. Add the butter and continue whipping. Add in the vanilla and then on low speed, the sieved icing sugar.

Halve the mixture and place one half in a separate bowl.

In the mixer, add the cooled white chocolate and beat until light and fluffy. Transfer to a bowl and repeat with the dark chocolate.

For icing, you can either use a dual colour piping bag which is made for such a job, or, as I have done, you can just use a normal piping bag, fitted with a star nozzle, or even just with the end cut off. Fill one side with the white chocolate and the other with the dark chocolate and squish to remove any air pockets. It doesn’t have to be exact as you are going for a marbled effect.

Oreo cake closeup

Cut the cakes in half and pipe a little of the frosting on one half. Sandwich together with the other half and pipe more onto the top and adorn with a mini Oreo cookie.

Chipotle Chilli Grilled Salmon Kebabs

Grilled salmon skewers with a smoky and spicy marinade.  Served with a cooling mint and coriander yogurt dip, pita bread and salad.  Perfect for hot and spicy summer nights!

Salmon kebabs2

All of my family love salmon, so these go down really well and can be cooked on a griddle pan, the barbecue, or even on a lined baking sheet in the oven. You can up the spice levels by adding more of the chipotle marinade. The coriander/cilantro used in the yogurt dip is entirely optional. I love it, but the rest of the family – not so much!

As a contact lens wearer, I always use disposable latex gloves when chopping, or using any kind of chilli in a marinade. So much pain and the chilli lasts on your skin for hours, despite washing like Lady McBeth!

salmon kebab close

Salad:
Baby salad leaves
Handful of black olives
Hothouse cucumber slices
Small handful of cherry tomatoes – halved
Feta cheese, crumbled
Lemon wedges and warm pita to serve

Chipotle marinade:
2tbs prepared chipotle paste
Juice of 1 small lime
2tsp olive oil

Kebabs:
Around 400g/14oz Salmon cut into large cubes – this is enough for 2 hungry people
1-2 Courgettes/zucchini, halved down the middle and cut into chunks
1 yellow pepper, cut into large squares
Salt and pepper to season

Yogurt dip/dressing:
6tbs Greek yogurt
Small bunch of chopped mint and coriander/cilantro
Zest and juice of a small lemon
Pinch of salt and pepper

Mix together the chipotle paste, lime juice and olive oil and add to the salmon, turning to coat.  I use gloves and gently rub the marinade over the fish with my hands. Cover and refrigerate for an hour.

Method:
When you are ready to cook, pre-heat the griddle pan and assemble the salad ingredients on the plates. This is also a great barbecue recipe but just remember to soak any wooden skewers first. I use flat metal skewers so the salmon and vegetables don’t move around when I’m turning them.

Thread the fish and vegetables onto your skewers and season with a little salt and freshly ground black pepper.  Place onto the hot grill pan or barbecue. They will cook very quickly – around 2-3 minutes per side.  If you are cooking in the oven.  Cook at 200°C/400°F. They will take around 12 minutes, depending on the size of the chunks of salmon, but keep an eye on them so that the salmon doesn’t overcook.

salmon kebab closeup

Serve over the salads with the yogurt, warm pita and lemon wedges and a little coriander sprinkled over the top (or not if you don’t like it!)