Minty Cucumber and Tomato Salad

It’s SO hot! I have loads of baking recipes I want to try out, but I think putting on the oven today might actually kill us.

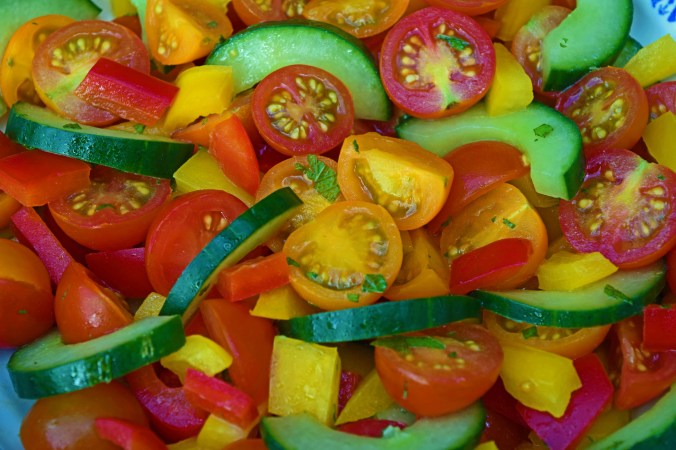
We’ve been having lots of salads in this hot weather and this one is cool cucumber with sweet cherry tomatoes, peppers and cooling mint. I really like to make my chilli and cucumber salad too, but this with the mint is super cooling on yet another hot day.

Minty tomato salad1

When I add cucumber to a salad, I always scoop out the wet seeds. I never peel them either; I think the nice green skin is the best bit.

This is a very colourful salad with red and yellow peppers and sweet cherry tomatoes. Cherry tomatoes tend to be nice and sweet all year round, so this is a good recipe for anytime. Feel free to add in some thinly sliced red onion too, that would work well here – IF you like eating raw onion that is!

This super simple recipe can be made more substantial by adding cubes of cheese, such as feta, or served as a side salad, alongside some grilled fish or chicken. It’s quite portable too, so a very good salad to take on a picnic.

I don’t like to add too much dressing to this, but extra can be served on the side.

Ingredients:
1 cucumber
1 pack of cherry or grape tomatoes
1 red pepper
1 yellow pepper

Dressing:
2tbs olive oil
1tsp Dijon mustard
1 tbs lemon juice
10 mint leaves, finely chopped
Tiny pinch of salt and pepper to taste

To serve:
Extra mint
Cubes of eta cheese (optional)

Method:
Halve the cucumber lengthways and use a spoon to scoop out the seeds, then slice and add to a large bowl.

Chop the cherry tomatoes into halves, or quarters and add them to the cucumber slices.

Cut the ‘cheeks’ off the peppers, leaving the core and seeds behind and slice and dice, before adding to the bowl.

In another small bowl, whisk the dressing ingredients together.

Minty tomato salad

Pour over enough dressing to moisten the vegetables and scatter over a little more mint if desired. This is really good with the addition of feta cheese to make a really colourful and cooling summer salad.

Rustic Nectarine and Blueberry Crostata

This is the ultimate summer tart really. A tender, flaky crust, filled with frangipane, fresh nectarines and blueberries.

Nectarine blueberry crostata5

These nectarines were so fresh, sweet and juicy, they were almost too good to use in this tart – almost! Any stone fruit and berries would work in this, but nectarines are my favourite summer fruit and work really well together with the blueberries.

The frangipane cream on the base of the fruit plumps up as it bakes in the oven, so as the tart expands, you can see little bits of the delicious almond mixture peeping up through all the juicy fruit.

I love making free form pies like this as they are so easy and the crust is so forgiving! It doesn’t have to be perfect; this is a lovely rustic and home-made tart, the perfect dessert on a hot summer day.

Nectarine blueberry crostata1

Ingredients:
Crust:

240g of plain/all-purpose flour
2tbs soft brown sugar, packed
½ tsp salt
170g butter, cut into cubes and refrigerated
Iced water

Frangipane:
60g ground almonds
60g room temperature butter
½ tsp almond extract (optional)
Zest of half an orange
Pinch of salt
1 large egg
2 tbs plain/all-purpose four

Fruit filling:
50g soft brown sugar – you might want to use more if your fruit is not overly sweet
2 tbs plain/all-purpose flour
Pinch of salt
4 nectarines, each one cut into 8 wedges
1 small punnet of blueberries
1 tsp vanilla extract

Topping:
1 egg, beaten with a little milk to make a wash
Demerara/Turbinado sugar for sprinkling – about 2tbs

Nectarine blueberry crostata4

Method:
Place the flour, sugar, salt and butter into a food processor and pulse until the butter is the size of peas. Add the iced water 1tbs at a time, while pulsing, until it just comes together. Turn out the dough, form into a circle, wrap in cling film and leave to chill for 30 minutes.

For the frangipane, use a hand mixer or stand mixer fitted with the paddle attachment and beat the almonds, butter, zest and salt together until light and fluffy. Then beat in the egg, almond extract and flour until smooth. Chill this until completely firm. I cheated and stuck it in the freezer while I prepared the fruit.

Nectarine blueberry crostata

For the fruit filling, my nectarines were super sweet, so they didn’t need too much sugar, but if you find yourself with rather tart fruit, then you can add a little more sugar.

I placed the nectarines, blueberries, four, salt and vanilla into a bowl and tossed gently until everything was coated. Everything was very juicy, so I didn’t need any extra liquid, but a squeeze of orange could be added at this stage too.

To assemble the tart, roll out the dough into a large circle on a lightly floured piece of parchment, or non-stick liner to a thickness of around a £1 coin.

Scrape the frangipane into the centre of the dough and smooth out with the back of the spoon, or an off-set spatula, leaving a good 2 inch border all the way around.

Leaving any extra juices behind in the bowl, pile the fruit (or very artistically arrange) on top of the frangipane, still leaving the border behind.

Brush the dough border with the egg wash and fold the crust up and over the filling, pleating and gently pressing down to seal the crust in place. The centre of the tart will remain exposed.

Brush the outside of the crust with the egg mixture and sprinkle the Demerara/turbinado sugar generously to coat. Then chill the tart until the whole thing has firmed up – around 30 minutes – 1 hour.

Nectarine blueberry crostata3

Pre-heat the oven to 190°C/375°F

Place the tart, still on the parchment or liner, onto a large baking sheet and bake in the oven for around 45 minutes, or until the crust is a deep golden colour and the frangipane filling is cooked through. The tart will expand and spread out a little as it bakes and the frangipane filling will puff up and around the fruit.

Nectarine blueberry crostata2

Transfer to a wire rack to cool for around 10 minutes if serving warm with vanilla ice cream, or leave to go completely cold. The tart will firm up as it cools, making it a perfect dessert to take on a picnic.

Prawn and Avocado Summer Rolls

Its been a long, hot summer so far with no signs of it ending anytime soon. For a summertime meal that is light, flavourful but substantial too, summer rolls are a good choice.

Summer roll ingredients

You do need to buy a specialist ingredient to make these, but the rice wrappers are quite readily available in the supermarket, along with the rice noodles and on Amazon too.

Once you have your ingredients ready, they are quick and easy to make and no deep frying required like with spring rolls.

My family really enjoyed them and you can leave out the fresh herbs, if you want to serve them plain. The juicy prawns and fresh, crunchy vegetables are a nice alternative to a salad and just the thing for yet another hot day.

Is anyone else ready for Autumn, or just me!?

Ingredients:
Vietnamese rice wrappers – available at most supermarkets or Amazon
Approx 100g vermicelli rice noodles
1 pack cold water prawns/shrimp
1 avocado
1 x red and yellow pepper
1 carrot
1 Romaine lettuce
Fresh coriander/cilantro and mint leaves
1 large lemon
Sweet chilli sauce to serve

Method:
This is mostly an assembly job and you need to have everything ready and to hand before you can make the rolls.  My ingredients made 8 rolls, but you can easily scale this up for more people.

Summer roll veggies

Start by preparing the rice noodles as per the packet and leaving to cool.

When they are ready, prep all the veggies by very thinly slicing the peppers and carrots into matchsticks. Thinly slice the avocado and toss in lemon juice so it doesn’t discolour. Tear the lettuce into large pieces.

Toss the prawns in lemon juice and freshly ground black pepper.

Summer rolls2

In order to soften the rice wrappers, they need to be submerged into warm water. I used a shallow pan and gently heated the water, but you could just use warm tap water in a large enough dish. Just be sure to follow the instructions on the packet.

When you have everything ready, you need to work quickly.

Submerge the wrapper into the warm water and leave for around 10 seconds, it will quickly soften and become very pliable.

Place onto a board and stuff with a little of everything, taking care not to overstuff.

Summer rolls4

As you can see the ingredients through the wrappers, you can place the herbs on first so they can be seen. Some people get very artistic!

I used coriander for some and mint for the others as my husband loves mint, but isn’t a big fan of coriander (like me!)

Summer rolls

I started with the herbs and lettuce then added the noodles, prawns, avocado, peppers and carrots. Place the sticks of vegetables all pointing the same way in the centre of the wrapper, fold over the sides and roll away from you like you would a burrito.  Roll fairly tightly, but gently, folding in the ends as you get to the end of the roll.  The ingredients will be fully enclosed in their see through parcel.

While assembling the rest, place the summer rolls seamside down onto your serving plate, keeping them separate as they will stick together if they are touching.

Carry on until you have used up all your ingredients, then cut in half diagonally and serve immediately.

Summer rolls zoom

Enjoy with a dipping sauce, either home made or a good one from the supermarket. I have used a sweet chilli one, but hoisin or a peanut sauce is really good too.

These make a really delicious and light summer lunch or supper and are really worth trying.