Black Cherry Puff Pies

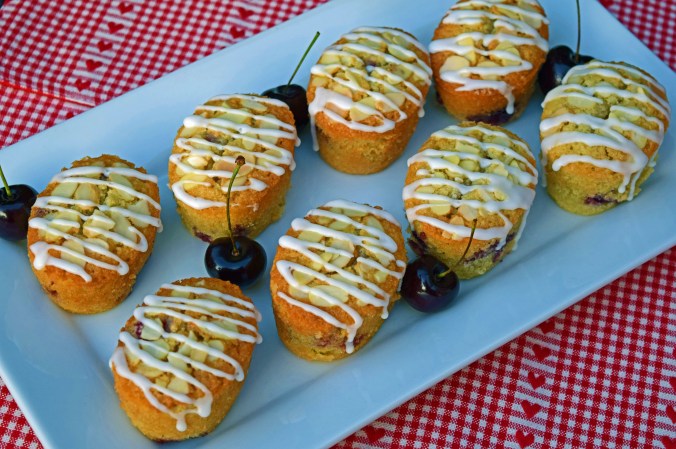
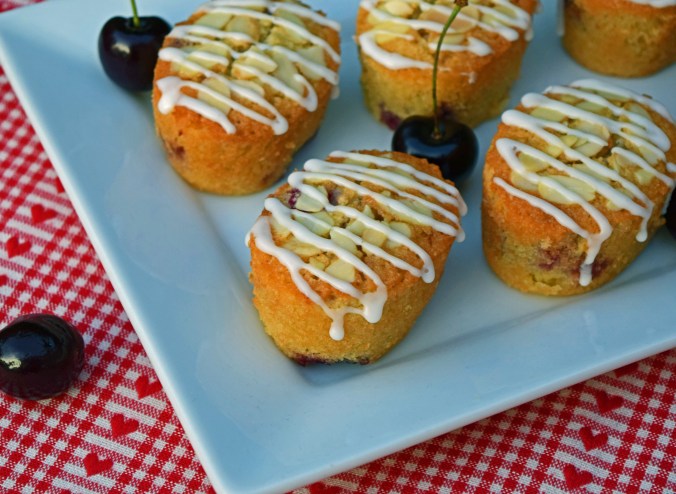
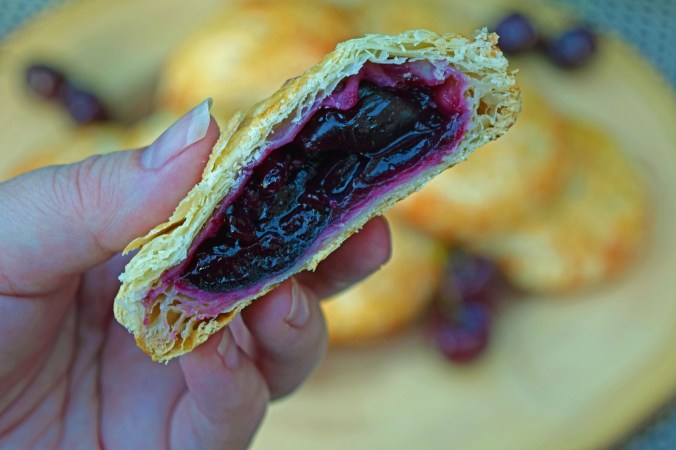
We are still making the most of the stone fruit season here and these big black cherries were so juicy and sweet they were almost too good to put in a pie, well almost!

Cherry Hand Pies

Pitting cherries is always a messy business even with a cherry stoner, but there is something quite satisying when you fire the stones out of the cherries once you get going. Anyone else eat the little circles of cherry that come out attached to the stones, no, me neither!

I must admit that I did cheat and used not only puff pastry from the supermarket, but the ready rolled stuff too. The all-butter puff pastry you can get is really very good and so much easier than making it yourself.

The pies themselves are really simple, with not too many ingredients.  The buttery, flaky layers and super sweet juicy cherries make for a perfect summer baked treat and would be a welcome addition to any picnic.

Now the heatwave has released its grip on us (for now anyway) the oven can come back on!

Ingredients:
2 packs of ready rolled puff pastry, or you can buy the blocks and roll yourself, or of course home made would be best!  Keep refrigerated until ready to use
1 large punnet of black cherries – I bought a 500g pack
1 small lemon
1/4 cup sugar – use a little more if the cherries are very tart
1tbs corn flour/starch
1tsp vanilla extract
1tsp almond extract (optional)
1 egg and a little milk to make a wash
Demerara/Turbinado sugar for sprinkling

Cherry Hand Pies1

Method:
Place the pitted and halved cherries into a pan with the sugar, juice from the lemon, corn flour and the extracts. Stir everything together to combine.

At this point, you could mix the lemon juice and corn flour separately and then add, but I’ve never had any lumps just adding everything in together.

Heat the cherry mixture gently and stir everything together, taking care not to break up the fruit. The mixture will thicken slightly as it cooks.

Cook on a low heat for around 5 minutes, until the cherries soften a little and the juices are thickened.

Leave the pie filling to cool and then place in the refrigerater until cold. You can’t add hot pie filling to a cold crust as bad things will happen to the pastry.

Place the chilled, rolled out pastry on a lightly floured board and cut out circles – I got enough for 8 bases from one sheet and the 8 lids on the next sheet.  Whatever size cutter you go for, just make sure you have an even number, otherwise one of them might have to become a tart!

Place the pie bases onto a lined baking sheet and add a spoonful of the cherry pie filling into the centre of each circle, taking care to leave an edge.

Brush the edges with the egg wash and place the pastry lid onto each pie.

Crimp the edges together with a fork, making sure you have a good seal. I keep a little pile of flour ready when I do this, so I can keep dipping the fork in to stop it sticking to the pastry as it will be warming up a little by now.

You need to refrigerate the pies for 30 minuites to allow everything to relax.  You can also freeze them at this point too.

Cherry Hand Pie

When you are ready to bake, heat the oven to 220°C/425°F

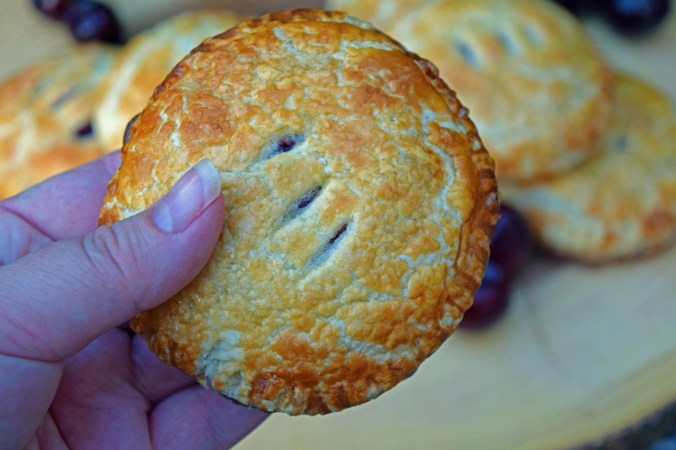
Brush the pies with the egg wash and make a few slits in each pie to let the steam out.  Finally, sprinkle over a little of the sugar.

Bake for around 20 minutes. The pies will puff up and go a lovely golden brown colour when they are ready.

Leave them to cool a little before allowing anyone to sample them as the filling will be very hot!

Cherry Hand Pie1

They are just the best when still warm and crisp, but good cold too.

Harvest Salad Bowls

I picked up some great seasonal produce this weekend, including some seriously delicious, fresh corn. Rather than simply boil and serve on the cob, I decided to grill it and make a summer salad. The slight charring you get, makes for a really nice, slightly smoky flavour.

Harvest Salad

This salad also has my favourite Cavolo Nero kale, crisp red apples, roasted sweet potato, beets and goats cheese with a balsamic dressing. This makes enough for two large salads with leftovers for a lunchbox the next day.

Harvest salad bowl

Ingredients:
1 sweet potato
2 small beetroots
2 corn on the cobs, husks and silk removed
A small bunch of kale, ribs removed and torn intp pieces – I used Kavolo Nero
Small bunch of mixed salad greens
Goats cheese – I used two small individual cheeses broken into large pieces
1-2 crisp apples
1 lemon, halved

Harvest salad bowl2

Dressing:
3tbs olive oil
2tbs balsamic vinegar
1tsp maple syrup
1tsp Dijon mustard
Pinch of salt and pepper

Method:
Start by peeling the sweet potato and chopping into bite sized chunks. Rub with a little olive oil, salt and pepper.

Roast at 220°C/425°F for 30-35 minutes, or until tender and the edges are just starting to catch.

Sweet potato

Do the same with the beets, but I like to roast them separately to keep the colours separate. Beets do like to turn everything red!

To grill the corn, heat a griddle pan and rub each cob with a tiny amount of oil and place onto the hot griddle, tuning until cooked all the way around. You can also do this on a barbecue. When the corn is cool enough to handle, cut the kernels off and set aside.

Grilled corn

While the vegetables are roasting and the corn grilling, massage the kale in one half of the lemon juice. This tenderises it a little and helps to bring out the vibrant colour too.

Harvest salad bowl3

Chop the apple into bite sized pieces, leave the skin on, and toss in the rest of the lemon juice to avoid it discolouring.

When the vegetables are cool, assemble the salad by adding the massaged kale to the other salad greens, roasted sweet potato and beets, apples, crumbled goats cheese and the grilled corn. Gently turn the salad to combine everything together.

Harvest salad bowl1

Whisk or shake the dressing ingredients together and drizzle over the top.

Harvest salad bowl4

Top with toasted pumpkin seeds or pecans if you like a bit of crunch. This late summer salad is full of flavour and perfect to enjoy on a warm afternoon in the garden.

Cherry Friands

I love cherry season! Actually, I love all stone fruit and consider it one of the best things about summer. These friands are full of juicy, fresh summer cherries and even the icing sugar is black cherry flavoured. Not a necessary ingredient, you can easily make this with regular icing sugar, but well worth using. I love to try out new ingredients (despite my kitchen not being big enough for my enthusiasm)!

Cherry Friands1

Cherry Friands2

I have a cherry stoner (as I am also enthusiastic about gadgets) and this does make pitting the cherries a little easier, but if the cherries are nice and ripe, the stones should come out fairly easily by just halving them and removing the stones that way.

Ingredients:
250ml egg whites – I used Two Chicks pasteurised egg whites
250g icing sugar – I used Sugar and Crumbs Black cherry flavour that I got from The Vanilla Valley
230g Cherries – pitted and halved
165g butter – melted plus extra for buttering the pan
130g Ground almonds
100g plain/all-purpose flour
Lemon zest from one small lemon
Small handful of slivered almonds

To decorate:
Black cherry flavoured icing sugar mixed with little water to make a glaze for drizzling

Cherry Friands

Method:
Preheat the oven to 180°C and brush the friand pan with melted butter (if anyone knows where to get friand/oval paper cases, please let me know!)

In a large bowl, mix the flour, ground almonds and icing sugar together and mix together.

Using a stand mixer fitted with the paddle attachment (or using a hand mixer), beat the egg whites until slightly frothy/broken down and add in the melted butter until well mixed.

Fold in the dry ingredients and finally, stir in the cherries gently so as not to break them up (mine were super juicy).

Divide the batter between the holes and scatter over a few slivered almonds.

Bake in the pre-heated oven for 25-30 minutes. The little cakes should be golden brown and a toothpick should come out clean when inserted into one.

Cherry Friand2

Leave to stand for at least 10 minutes as they are very fragile when just baked. The cherries are quite moist, so it’s best to leave everything to cool and firm up before attempting to turn them out or you risk leaving half the cake behind!

Gently turn out onto a cooling rack and leave to cool completely.

Cherry Friand

Mix a few tablespoons of the black cherry icing sugar (or normal icing sugar) with a teaspoon or two of water to make a simple glaze. Drizzle back and forth over the friands and leave to set.

Cherry Friand1

These were the most popular friands I have made to date and the black cherry icing sugar is really worth using as it makes the cakes extra special.