Southwestern Salad Bowls

With the lengthening days, blue skies and sunshine, thoughts turn to salads, barbecues and eating alfresco. That’s the fantasy anyway. My reality is as soon as the sun comes out and the trees have their beautiful blossom, my horrible hay fever with huge sneezes and itchy eyes kicks in!

Southwestern Salad1

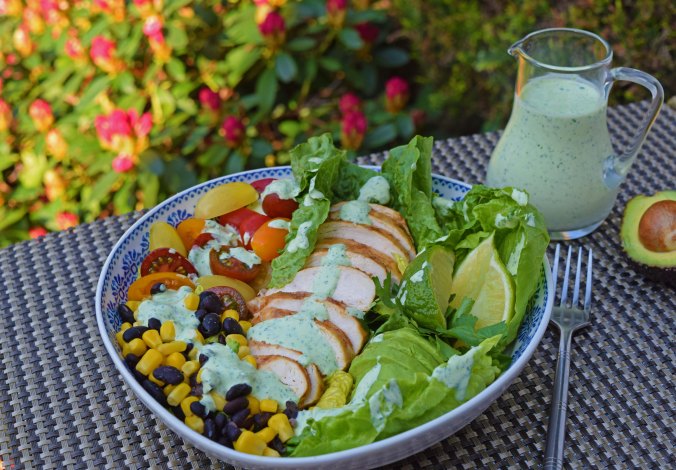
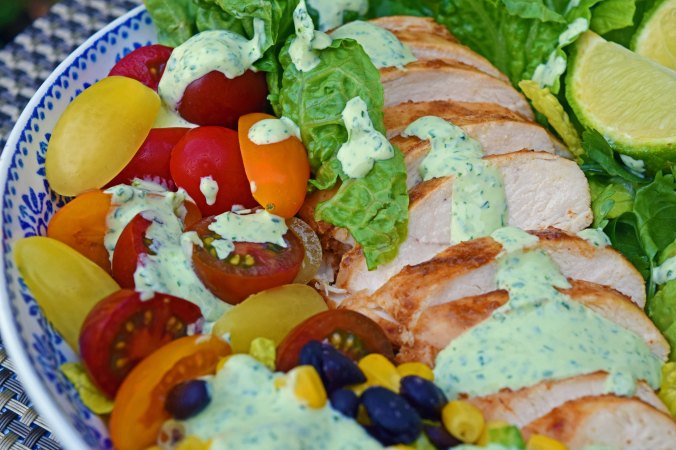
This salad is particularly summery, full of flavour and good for you too. The chicken is coated in taco seasoning, so it’s a little spicy and the cool, creamy dressing is a perfect accompaniment.

I’ve made my own taco seasoning as it’s not so readily available in the UK, but I like to make my own spice blends anyway as they will always be fresher than anything you can buy in the shop and you can customise and add a little more chilli if you like it spicier. However, my taco seasoning isn’t too hot as I was making it for the family, but it does have a bit of a kick.

Taco seasoning also goes amazingly well on anything that is good grilled or roasted – prawns, fish, vegetables and steak kebabs!

Southwestern Salad5

You can serve the chicken on this salad warm or cold and I sometimes scatter hot crispy, smoked bacon over the top and a scattering of grated cheese for something extra!

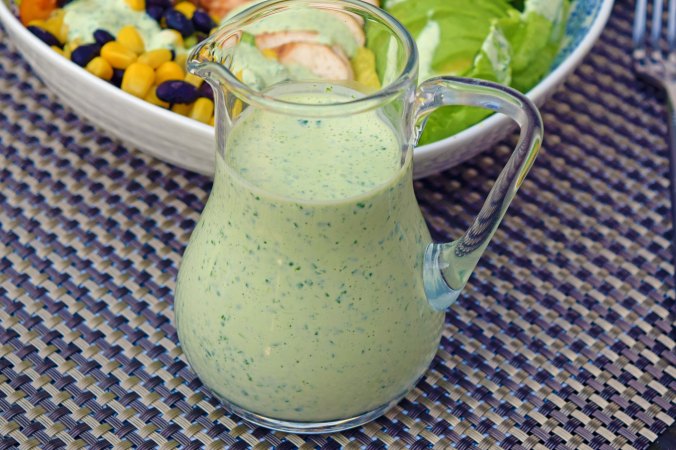
I tried a few variations for the dressing and decided that I liked half greek yogurt and half sour cream, but it really could be all of either. I included a tiny squidge of honey too, just to balance out all the flavours.

This recipe is enough for 4 large chicken breasts, but can easily be halved to serve 2. I like to cook extra for leftovers, or to take to work for a packed lunch.

Taco seasoning :
4tbs chilli powder – I used hot chilli powder
2tbs cumin
1tbs paprika – I used smoked paprika
1tsp salt
2tsp dried onion flakes
1tsp garlic powder
1tsp dried oregano – you could use Italian seasoning if you don’t have any

Simply mix everything together and store in an air tight jar until you are ready to use.

Taco Seasoning

Dressing:
3tbs sour cream
3tbs Greek yogurt
1 medium sized bunch of coriander/cilantro including the stalks
Zest and juice of one small lime
Pinch of salt and pepper
1tsp (tiny squidge) of honey

Blend everything together until smooth, taste for the seasoning and refrigerate. I just used a hand blender as I didn’t want to get my main blender or food processor out!

Coriander dressing.jpg

Ingredients for the salad:
2tbs taco seasoning
Pinch of salt
1.5tbs olive oil
Juice and zest of one small lime
4 skinless chicken breasts
2 Romaine lettuces, roughly chopped or torn
2 avocados, skinned, sliced and tossed in lemon or lime juice
1 punnet of tomatoes – I used multi-coloured ones
1 can of sweetcorn, rinsed and drained
1 can of black beans, rinsed and drained
A few coriander leaves and lime wedges to garnish

Southwestern Salad2

Method:
Mix together the seasoning, salt, lime and oil together and thoroughly coat the chicken. You can do this in a plastic bag, or in a dish covered with cling film. Refrigerate and leave to marinate for at least 30 minutes, but overnight is even better.

Grill the chicken on a griddle pan or frying pan until cooked through – 4-6 minutes on each side depending on how big the pieces are. You might need to add a little more oil and then leave to rest if using it warm, or leave to go completely cold, before slicing and preparing the rest of the salad.

Southwestern Salad3

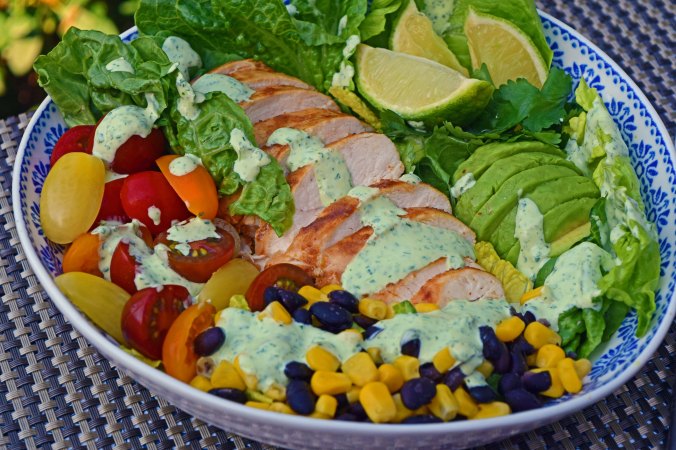
When ready to serve, place a bed of lettuce into each bowl, top with the sliced chicken and then arrange the tomatoes, avocado, beans and corn around the chicken. You can also toss everything together before placing the chicken on the top.

Garnish with a few coriander leaves, before pouring over a little of the dressing. Serve the salad with extra dressing and my husband likes the addition of crispy bacon and cheese too.

Southwestern Salad2

I always like to make enough so I can take a lunchbox to work the next day with the dressing in a little screw top pot. Just remember to toss the avocado in juice or it will discolour.

Southwestern Salad lunchbox

Blueberry and Lemon Friands

My children all love blueberries and are mad on blueberry muffins. They love friands too, so before the summer is out I decided to cook a batch of blueberry ones which went down very well indeed!

Blueberry Friands

Since getting the friand tin, I have absolutely loads of ideas for different versions of friands, including using different types of nuts, but I’m trying to space them out a bit so they don’t get bored of them.

They are just so easy to make, I have to keep trying out different recipes. So far they have all been really good. This recipe is very similar to the blackberry recipe the other week, but there are a few tweaks. I use the Two Chicks pasteurised egg whites that I buy from the chilled section in the supermarket. As you can get two batches from each carton, I tend to test out a new one with the second half. The next one will be an autumnal themed one I think…!

Blueberry Friands overhead

Ingredients:
6 large egg whites/250ml Two Chicks pasteurised egg whites
250g icing/powdered sugar, sieved
130g ground almonds
100g plain flour, sieved
Zest of one un-waxed lemon
160g melted butter + extra for buttering the pan
1 large punnet of blueberries

Preheat the oven to 180°C and brush the friand tin with melted butter

Method:
In a stand mixer, fitted with the paddle attachment, whisk the egg whites until frothy and then add the melted butter and lemon zest.

On low speed (because it goes everywhere if you don’t) add the icing sugar and fold in the flour until just combined. Add in ¾ of the blueberries, leaving some to stud the top with. Mix these in by hand as you don’t want them to break up.

Using an ice cream scoop, divide the mixture equally between a 12 hole friand pan. Place 2-3 blueberries on the top of each cake and gently press them in. They will sink into the cakes a little as they bake.

Blueberry Friands double shot

Bake for around 30 minutes, until they have risen and turned golden brown. A toothpick inserted into the centre should come out clean.

Blueberry Friand1

Leave to rest for 15 minutes before gently turning out onto a wire cooling rack and dust with icing sugar.

Butternut, Kale and Sage Derby Quiche

I love all kinds of cheese and experimenting with recipes that contain cheese. When I was a child I used to look at Sage Derby in the delicatessen and think because it was so green, it must be really strongly flavoured, or pungent. However, when I actually tasted it, I loved it. Not strong at all, but a lovely fragrant, herby cheese that’s good for eating and cooking with.

butternut quiche

I discovered Fowlers Sage Derby cheese recently and it caught my eye as it didn’t have the usual bright green marbling. It was however, full of sage. I tried it and absolutely loved it, so of course I had to try and cook with it.

The autumnal weather we have been having lately has been making me think of the flavours of autumn – kale and butternut squash and of course sage goes so well with it. I decided the best way to showcase the cheese was in a quiche. Roasted butternut squash, wilted kale cooked with a little fresh sage and lots of the Sage Derby cheese. The result was completely decadent and delicious.

Butternut quiche side

Crust:
300g/10.5oz plain/all-purpose flour
1tsp salt
227g/8oz butter cut into cubes and chilled
1 large egg, beaten
1-2tbs iced water

Ingredients:
1 small butternut squash, peeled, halved and seeds removed (a small pumpkin would also work well)
1 large onion, halved and thinly sliced
1 bunch of Cavalo Nero/Tuscan Kale, washed, ribs removed and roughly chopped or torn
5 fresh sage leaves, finely shredded
6 extra large eggs
280g Sage derby cheese – grated
¾ pint double/heavy cream
Salt and pepper
A few scrapes of fresh nutmeg
A little olive oil and butter

Method:
Add the flour, salt and butter to a food processor fitted with the steel blade. Pulse until the butter is the size of small peas, or rough breadcrumbs.  Add the iced water a little a time until the dough just comes together.  You might not need all of the water.

Form the dough into a ball, flatten into a disc and wrap in plastic. Leave to chill for 30 minutes.

Roll out the pastry and, without stretching, line the base and sides of a 10inch/25cm tin. Return to the fridge and chill for another 30 minutes.

Preheat the oven to 180°C/350°F

Line the pastry with parchment paper or foil, leaving plenty to come up the sides. Fill with baking beans and place in the oven to blind bake for 15-20 minutes.  Take the pastry shell out of the oven, remove the paper and beans and return to the oven for further 5 minutes or until the pastry feels dry.  Leave to cool a little before adding the filling.

Pre-heat the oven to 220°C/430°F and slice the butternut squash just under 1cm thick and cut the slices in half. Toss in 1tbs olive oil with 1tsp salt and freshly ground black pepper and roast in the oven until the squash is tender and catching on the edges. This will take around 25 minutes.

While the squash is roasting, heat ½tbs of oil and a small knob of butter in a pan and sauté the onion slowly with a pinch of salt and pepper until they are soft and golden. Set aside to cool

Then in the same pan, add a tiny bit more butter if the pan is dry and sauté the kale and shredded sage until wilted, set aside with the other vegetables.

Lower the oven to 180°C/360°F

Roll out the pastry on a floured board and line a 25cm/10inch tin, leaving an excess to trim off later.

Butternut quiche close up

Place baking paper in the tin and fill with baking beans. Bake blind for 20 minutes. Remove the paper and beans and then return to the oven to bake for another 5 minutes.

Whisk the eggs and cream with the nutmeg, another ½tsp salt and a little more black pepper. Stir in the grated cheese.

Layer the onions, squash and kale in the pastry case and cover with the cheesy egg mixture.

Carefully place in the oven and bake for 30-40 minutes or until just set in the middle. The quiche will be puffed and golden brown and smelling delicious.

butternut quiche slice out

This is lovely eaten warm with a salad, but equally good cold. We had some of this one cold with some pickled shallots which went together perfectly.

Quiches are always good to take on a picnic or put in a lunchbox too. I think this one is good any time of year, but would be perfect for an autumn picnic and could easily hold its own on a festive table at Christmas.

Butternut quiche slice

It’s still summer now, but the butternut squash and sage combination is a precursor for all the Autumnal flavours – coming soon!